Using DataTables
In this tutorial, we will be learning about how to extend the functionality of nopCommerce with custom functionality for the admin panel and create a page containing a table with some data as a report. Before starting this tutorial, you need to have some prior knowledge and understanding of some of the topics.
If you are not familiar with the above topics, we highly recommend you learn about them first.
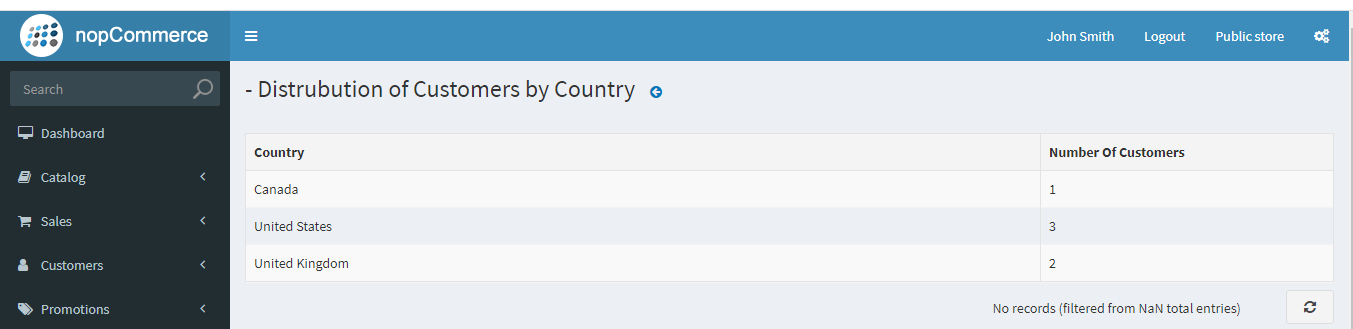
This tutorial will show you how to create a table that displays information about the distribution of users by country (based on billing address). Let's walk through the step-by-step process of creating the aforementioned functionality.
Create a nopCommerce plugin project
We are assuming that you already know where and how to create a nopCommerce plugin project and configure the project according to nopCommerce standards. If you don't know then you can visit this page to learn how to create and configure the nopCommerce plugin project.
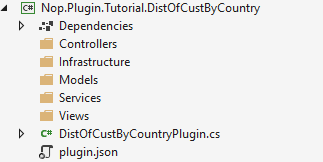
If you have followed the above-provided link to create and configure your plugin project then you may end up with a folder structure like this.
Models/CustomersDistribution.cs
First, let's create a model named CustomersDistribution inside the Models folder.
public record CustomersDistribution : BaseNopModel
{
    /// <summary>
    /// Country based on the billing address.
    /// </summary>
    public string Country { get; set; }

    /// <summary>
    /// Number of customers from a specific country.
    /// </summary>
    public int NoOfCustomers { get; set; }
}
Also, let's add the search model named CustomersByCountrySearchModel inside the Models folder.
public record CustomersByCountrySearchModel : BaseSearchModel
{
}
nopCommerce uses the repository pattern for data access which is ideal for dependency injection mechanism.
Services/ICustomersByCountry.cs
Now let us create a service that fetches required data from a database. For service, we will create an interface and a service class implementing that interface.
public interface ICustomersByCountry
{
    Task<List<CustomersDistribution>> GetCustomersDistributionByCountryAsync()
}
Services/CustomersByCountry.cs
Here we are creating a class named CustomersByCountry which implements the ICustomersByCountry interface.
public class CustomersByCountry : ICustomersByCountry
{
    private readonly IAddressService _addressService;
    private readonly ICountryService _countryService;
    private readonly ICustomerService _customerService;

    public CustomersByCountry(IAddressService addressService,
        ICountryService countryService,
        ICustomerService customerService)
    {
        _addressService = addressService;
        _countryService = countryService;
        _customerService = customerService;
    }

    public async Task<List<CustomersDistribution>> GetCustomersDistributionByCountryAsync()
    {
        return await _customerService.GetAllCustomersAsync()
            .Where(c => c.ShippingAddressId != null)
            .Select(c => new
            {
                await (_countryService.GetCountryByAddressAsync(_addressService.GetAddressById(c.ShippingAddressId ?? 0))).Name,
                c.Username
            })
            .GroupBy(c => c.Name)
            .Select(cbc => new CustomersDistribution { Country = cbc.Key, NoOfCustomers = cbc.Count() }).ToList();
    }
}
We implemented the method of the interface that retrieves data from the database. We used this approach so that we'll be able to use dependency injection techniques to inject this service into the controller.
Infrastructure/PluginNopStartup.cs
To register our interface and its implementation in the dependency injection (DI) container, we need to create a class that implements the INopStartup interface. This interface includes two methods and one property. Our primary focus is on implementing the ConfigureServices method, where we will register our interface with the DI container.
/// <summary>
/// Represents object for the configuring services on application startup
/// </summary>
public class PluginNopStartup : INopStartup
{
    /// <summary>
    /// Add and configure any of the middleware
    /// </summary>
    /// <param name="services">Collection of service descriptors</param>
    /// <param name="configuration">Configuration of the application</param>
    public void ConfigureServices(IServiceCollection services, IConfiguration configuration)
    {
        //register custom services
        services.AddScoped<ICustomersByCountry, CustomersByCountry>();
    }

    /// <summary>
    /// Configure the using of added middleware
    /// </summary>
    /// <param name="application">Builder for configuring an application's request pipeline</param>
    public void Configure(IApplicationBuilder application)
    {
    }

    /// <summary>
    /// Gets order of this startup configuration implementation
    /// </summary>
    public int Order => 3000;
}
Controllers/CustomersByCountryController.cs
Now let's create a controller class. A good practice to name plugin controllers is like Controller.cs. For example, TutorialCustomersByCountryController, here Controller. But remember that it is not a requirement to name the controller with it is just the recommended way by nopCommerce for naming but the Controller part in the name is the requirement of .Net MVC.
    [AutoValidateAntiforgeryToken]
    [AuthorizeAdmin] //confirms access to the admin panel
    [Area(AreaNames.Admin)] //specifies the area containing a controller or action
    public class DistOfCustByCountryPluginController : BasePluginController
    {
        private readonly ICustomersByCountry _service;
        public DistOfCustByCountryPluginController(ICustomersByCountry service)
        {
            _service = service;
        }

        [HttpGet]
        public IActionResult Configure()
        {
            CustomersByCountrySearchModel customerSearchModel = new CustomersByCountrySearchModel
            {
                AvailablePageSizes = "10"
            };
            return View("~/Plugins/Tutorial.DistOfCustByCountry/Views/Configure.cshtml", customerSearchModel);
        }

        [HttpPost]
        public async Task<IActionResult> GetCustomersCountByCountry()
        {
            try
            {
                return Ok(new DataTablesModel { Data = await _service.GetCustomersDistributionByCountryAsync() });
            }
            catch (Exception ex)
            {
                return BadRequest(ex);
            }
        }
    }
In the controller, we are injecting the ICustomersByCountry service we created previously to get data from the database. Here we have created two Actions one is of type HttpGet and another of type HttpPost. The Configure action returns a view named "Configure.cshtml" which we haven't created yet. And GetCustomersCountByCountry action which uses an injected service to retrieve data and return data in the JSON format. This action is going to be called by the data table which expects a response as DataTablesModel object. So, here we set the data property which is the data that will be rendered in the table.
Views/Configure.cshtml
Now let's create a view with DataTables where we can display our data which then can be viewed by our users.
@using Nop.Web.Framework.Models.DataTables
@{
    Layout = "_ConfigurePlugin";
}

@await Html.PartialAsync("Table", new DataTablesModel
{
    Name = "customersDistributionByCountry-grid",
    UrlRead = new DataUrl("GetCustomersCountByCountry", "TutorialCustomersByCountry"),
    Paging = false,
    ColumnCollection = new List<ColumnProperty>
    {
        new ColumnProperty(nameof(CustomersDistribution.Country))
        {
            Title = "Country",
            Width = "300"
        },
        new ColumnProperty(nameof(CustomersDistribution.NoOfCustomers))
        {
            Title = "Number Of Customers",
            Width = "100"
        }
    }
})
Views/_ViewImports.cshtml
The _ViewImports.cshtml file contains code to import all required references for our view files.
@inherits Nop.Web.Framework.Mvc.Razor.NopRazorPage<TModel>
@addTagHelper *, Microsoft.AspNetCore.Mvc.TagHelpers
@addTagHelper *, Nop.Web.Framework

@using Microsoft.AspNetCore.Mvc.ViewFeatures
@using Nop.Web.Framework.UI
@using Nop.Web.Framework.Extensions
@using System.Text.Encodings.Web
@using Nop.Plugin.Tutorial.DistOfCustByCountry.Models
@using Nop.Web.Framework.Models.DataTables;
@using Microsoft.AspNetCore.Routing;
- In
Configure.cshtmlwe are using a partial view namedTable. This is the nopCommerce implementation of JQuery DataTables. We can find this file underNop.Web/Areas/Admin/Views/Shared/Table.cshtml. There you can see the code for the implementation of DataTables. This view model takes aDataTablesModelclass for the configuration of DataTables. Let's explain the properties that we have set for theDataTablesModelclass. - Name: This will be set as an id for DataTables.
- UrlRead: This is the URL from where DataTables is going to fetch data to render in the table. Here we are setting the URL to
GetCustomersCountByCountryAction of theTutorialCustomersByCountrycontroller from where we are getting data for DataTables. - Paging: This property is used to enable or disable pagination for DataTables.
- ColumnCollection: This property holds the column configuration property.
There are several other properties that you can play around with to understand what each of the properties is used for.
Infrastructure/RouteProvider
Now the last step is to register our route for the Action "GetCustomersCountByCountry" of Controller "TutorialCustomersByCountry". We do not need to register the route for "Configure" Action because we have already registered that in the DistOfCustByCountryPlugin class.
/// <summary>
/// Represents plugin route provider
/// </summary>
public class RouteProvider : IRouteProvider
{
    /// <summary>
    /// Register routes
    /// </summary>
    /// <param name="endpointRouteBuilder">Route builder</param>
    public void RegisterRoutes(IEndpointRouteBuilder endpointRouteBuilder)
    {
        //add route for the access token callback
        endpointRouteBuilder.MapControllerRoute("CustomersDistributionByCountry", "Plugins/Tutorial/CustomerDistByCountry/",
            new { controller = "TutorialCustomersByCountry", action = "GetCustomersCountByCountry" });
    }

    /// <summary>
    /// Gets a priority of route provider
    /// </summary>
    public int Priority => 0;
}
Note
To learn more about nopCommerce routing please visit this page
Now just build your project and run it. Log in as an Admin user and go to the LocalPlugins menu under Configuration, there you will see your newly created plugin. Install that plugin. After installation is complete you will see a configuration button in your plugin. If you have followed correctly through this tutorial then you will see the output, something like the image below: